
|
|
While progress bars are common in any Windows environment, it is not difficult to construct a "simulated widget" in a Progress character-based application. The code is simple, but the result is an appealing and effective visual indicator. In the sample code that complements this tutorial, there is little other than the code that renders the progress bar. As a result, the display zips along in under a second! However, your application does much more and including such an indicator could add some noticeable benefits. 1. Define the variables and frame which will form the basis of our display. Note the character variable array ctrlProgressbar. 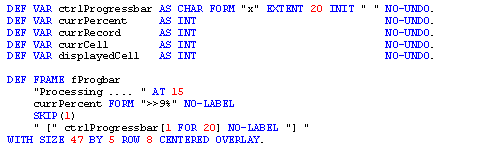
2. Define and open the query. Note that the query is opened with the PRESELECT option - more on this in a minute. 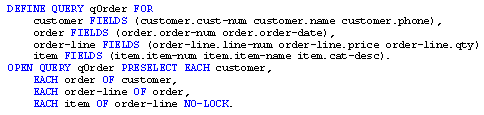
3. Now, the result list can be processed. 
4. With every iteration, we track our place in the recordset by incrementing the variable currRecord. 
Because we specified PRESELECT in step 2 - which built the entire recordset immediately - we can take advantage of the NUM-RESULTS function to return the total number of rows. With these pieces of information, we can easily calculate our percentage progress. The last thing we need to determine is how much of our progress bar should be coloured. The progress bar will be constructed from the character variable array ctrlProgressbar that we set up in step 1. Since we defined this as an array of twenty elements, we calculate variable currCell accordingly. 5. Having determined how much of our progress bar should be coloured, we adjust the elements of character variable array ctrlProgressbar using the COLOR statement with the MESSAGES colour phrase. 
N.B. This procedure assumes there will be at least twenty records in our result set. If there are less than this number, some of the cells in our progress bar may be skipped. If you expect to process recordsets of less than twenty rows, you can either reduce the size of the array variable as required or modify the block above to colour all cells up to and including our target cell as follows: 
6. Finally, we display the current state of frame fProgbar. 
7. ... And we're done! 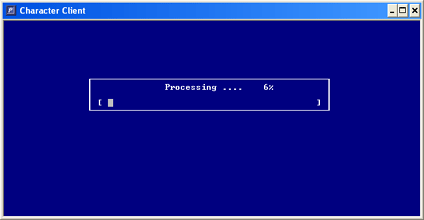
The completed procedure is as follows: 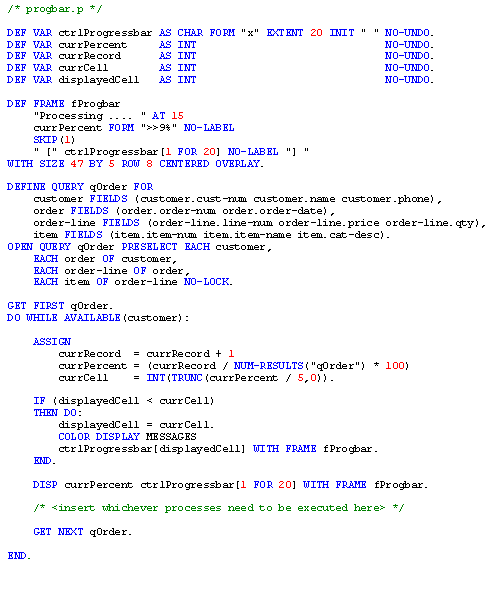
|
| Copyright © 2001-2005 sebastianfernandes.com | Terms of Use |
|
|